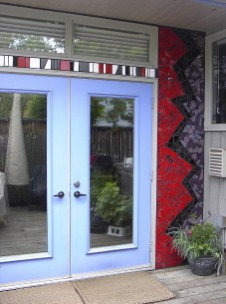
Thought since I’ve sorted through my photos for my tile pictures, I figured I’d show you the rest of the flower mosaic wall project. I didn’t get the color into the zig zag until the summer of 2003. It took a long time to find a selection of red and purple tiles – ones that didn’t cost the earth. I wasn’t thrilled with the purple selection but it worked out. When I had enough, I added the color to my zig zag.
 I had done more research about technique, and was able to lay out sections of tile on a table, on top of a pattern I traced off of the wall. Then I took a mixture of white glue and water and painted brown paper, which I laid on top of the tile. When the glue dried, I could pick up sections of the mosaic and install them on the wall on a layer of thin-set. This was a huge improvement over putting pieces up one at a time, but not perfect. When the thin-set was dry, I wet the brown paper enough to peel it away and expose the tile. Sometimes tile pieces would shift, which required prying them out of the thin-set and moving them over slightly.
When it was all done, Norm helped me grout the wall and we cleaned up so I could enjoy my colorful installation. Here are a few close up details.
 Our table is right outside these doors, so this is a view that we enjoy on a regular basis. (for a few months at least)


The red and grey wall is stunning! And the bit of purple really enhances the whole effect. Love it Terri 🙂
LikeLike
Very impressive!
LikeLike
wow, that’s really beautiful!
LikeLike
That is really very fun and inspiring. Love the colors that it adds to the entrance.
LikeLike
Thanks Tammy. It does cause me to smile whenever I’m out in the back yard. Makes it easier to look after the flower pots!
LikeLike
How fun! Love the last picture. Tile adds so much
LikeLike
Thanks. I could’t agree more.
LikeLike
Fabulous! You’ve inspired me. 🙂
Olga
LikeLike
Thanks Olga.
LikeLike
Reblogged this on Sue Coo Art (Sue Collins) and commented:
This tiling is fantastic….
LikeLike
Splendid work !
LikeLike
Thanks.
LikeLike
The tile work is beautiful.I love the inclusion of purple in your combination.It certainly adds to the beauty of your work. I loved your photographs.Thank you for your most impressive posts.Do you ever take a break from this hard work?
Ranu
LikeLike
Thanks Ranu. Do you mean the tile work or the blogging? The tile work is seasonal, since I don’t have a large heated space to work in. The blogging is 3 times per week, and so far I’ve been able to keep to the schedule.
LikeLike