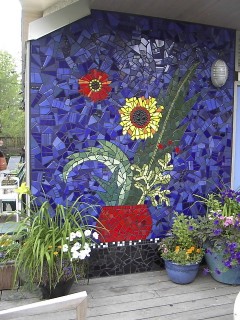
As usual I’ve been busy doing a little of this and a little of that, with nothing substantial to show for it. I was out with a couple of yoga friends on the week-end. We attended an excellent craft show called “Handmade Here.” It was a small show with just 25 artists, but there was some very lovely work offered. We three did our best to support the show. Then we came back home for coffee, and it was great to be able to share the tile work on our house with an appreciative audience. I thought I’d share the process of how I got started doing tile mosaic.
I decided I wanted to learn to tile, and thought it couldn’t be too hard to figure out. I already knew how to quilt, and this seemed very similar – just a little different material. I started out doing a bird bath using broken dishes and some inexpensive tile. It was a lot of work, and I realized I didn’t like the rough edges caused by breaking the tiles. I had difficulty using the tile nippers to cut the dishes. And then I realized that for all that work, all I would end up with was a bird bath. I already had a bird bath, so why was I wasting my time? I decided it would be much more satisfying to do a mural on the wall – a big mural. My theory by this time was go big or go home, and since I was already home, I had to go big. I decided to tile an entire wall on the side of the house.
I thought about a design for the mosaic and got busy buying tile to cover the wall. I bought every different cobalt blue tile that I could find in Calgary, as well as a variety of greens and some other bright colors. I had to buy more than the square footage of the wall because there would be waste made in the cutting. I could not imagine how much I’d need so I just bought lots!
I enlisted the help of my handy man, Norm, for technical advice, and he suggested he apply a thin coat of thin-set to the existing stucco to even out the work surface. The first part I tiled was the band above the dining room doors. It was 4″ high, so I only had to cut the tiles in one direction to get some variety. I was nervous, but once that strip was done I was raring to go. Then I started on the black base. I put the plain base at the bottom of the mural because this is a south exposure and I put large flower pots along this wall. By now I was cutting the tiles with a saw and sanding the edges. I hadn’t really mastered the saw, and the fit of the tile pieces is rather crude. Doing the black area gave me confidence so I carried on. I jumped over to the other side of the doors and put in my big black zig zag. I was on a roll.
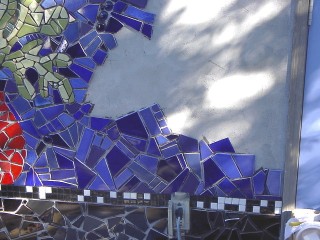
 I did a sketch for the flowers on the mural. I started at the base, doing the flower-pot, and then each imaginary plant that I created. I learned to handle the tile saw, and before long was comfortable cutting curves and tiny pieces. I was sanding the edges by hand. The tiles I used were various thicknesses, and I didn’t want to feel sharp edges if you ran your hand across the mosaic. Here are some step by step photos.
 This was incredibly tedious. I cut each piece like I was making a jig-saw puzzle. I put each piece up one at a time using a popsicle stick to apply thin-set to the back and placing it where I wanted it. I put paper on the wall to trace out the existing spaces and did some layout on tables. Unfortunately I couldn’t always duplicate the exact positions, so I had to trim and re-sand a lot of the tile pieces as I put them up. But eventually the wall was covered. I had help grouting, as this is a job that works best with 2 people. There is a blue tint on the photos as I had a blue tarp overhead. It was a hot summer. Norm is great at setting things up for me to work. Please note the improvement in the way the blue tiles fit together. Working on such a large area gave me lots of opportunity to learn in a fairly quick time frame. This part of the project (including grouting) took about 3 months.
 This was done in 2002, and it is still in perfect condition. I used an additive in the thin-set and the grout which expands and contracts with weather changes. The wall is under an overhang and protected from most precipitation. Also being attached to the house, there is no way for moisture to get behind the mosaic. I had intended to show all the tile work I’ve done on my house, but this took longer than I expected. I need to go to bed so you’ll have to wait for another post.


Beautiful Terri! What did you add to the Thinset and grout to make it more flexible and resistant to freeze/thaw?
LikeLike
I used a liquid latex product that replaces the water when mixing the thinset and the grout. I bought mine at Home Depot a few years ago. If you can’t find it, let me know and I’ll find the name of the product for you. It’s expensive but well worth it.
LikeLike
Reblogged this on Sue Coo Art (Sue Collins).
LikeLike
Amazing – wish I was that talented
LikeLike
It helps to be a little bit crazy as well.
LikeLike
Now crazy I can do!
LikeLike
That’s sort of what my handyman told me when I said I wanted to do a mosaic on that wall. He wanted to build a frame when I gave him the measurements. I said, oh no, I mean the WHOLE wall. Why not?
LikeLike
That really is impressive! At first I thought you were showcasing some photos of a mosaic, but I was then surprised that you did the mosaic. Very well done!
Believe it or not I love tile. I went to Rome a few years ago and went through several rolls of film taking pictures of the mosaics there. Also, during a visit to my in-laws in New Jersey, my Father-in-law suggested a visit to a Colonial era historic tile factory. I was the only one who was excited to go.
LikeLike
Thank you. I’d love to visit a tile factory. I have visited a few artists who make their own tiles and that would be easier and less expensive than buying tiles to cut up. The investment in the kiln and the space for it is too much of a committment. I like doing too many other things!
LikeLike
Wow! That’s beautiful! And you are so talented!
LikeLike
Thanks Madhu. The color and playful design really brighten things up – especially during our snowy winter. It was good fortune that there were so many different cobalt blue tiles available when I needed them. They are different thicknesses so there is a bit of a 3 dimensional quality as well. I just love tile!
LikeLike
Absolutely beautiful! Yummers!
LikeLike
Thanks so much!
LikeLike
Fantastic Terri. I love it. I bought various mosaic pieces, grouts and cutters last year with a view to making some mosaic paving slabs. Still a project in waiting i’m afraid. Yours looks great. Sue
LikeLike
Don’t worry, at least none of the materials have a best before date! As long as your grout doesn’t get wet, you’re laughing. I haven’t made any pavers yet, but I did some tile inserts on our driveway. I’ll post photos of them later. Thanks for stopping by, and good luck with your project – whenever!
LikeLike
Thank you
LikeLike
Sue, thanks for reblogging my tile work 2 post. Glad you liked it!
LikeLike
Just beautiful!
LikeLike
Thank you – it makes me happy whenever I look at it.
LikeLike
That’s one stunning mosaic and perfect backdrop to your other pots and plants ! So worth all the hard work and patience involved 🙂
LikeLike
Thanks so much. It was definitely worth it.
LikeLike
Hi,how long ago did you learn tiling?Your work is impressive. I would love to do something like this,but I don’t think I will be able to.So I’d rather see your marvelous job and hope to be re-incarnated as a tiler.What do you think?
Thank you for your post.
Ranu
LikeLike
Ranu, I started about 10 years ago, and am basically self taught. When I asked at tile stores for information, I was told I couldn’t do what I wanted to do outside. I decided to keep researching and dive right in. My design background has been very helpful, and my ability to ignore negative people has been invaluable. The only problem I’ve encountered is that the work is tremendously labor intensive. I need to find some help before I take on another big project. Good luck being re-incarnated as a tiler. I want to come back as a cat so that no one expects me to do anything – ever!
LikeLike